Creating a website can be daunting, especially if you’re new to the business. Luckily, dozens of free options are available, making it easy for anyone to create an online presence. In this article, you’ll learn how to create a website for your business quickly and easily, with simple step-by-step instructions and helpful tips.
Nowadays, starting a business is very easy. But first, you must get your website and promote it across social media platforms. This way, it will be easier for people to find your business online. However, before starting the promotion, the first step is to create a professional-looking website for your business.
Use the correct tools and resources, and you’ll find that creating a business website is easy.
There are several ways to create a website: hire a developer, use a free website builder, or learn how to code and design your website. However, before starting the process of creating your website, there are some things you need to consider.
Some of the most important things to think about when creating a website include the following:
- The purpose of your website – What are you trying to achieve with it?
- Who is your target audience?
- What type of content will you feature on your website?
- What design style do you want?
After answering these questions, you can start creating your website. The following guide will walk you through the steps of creating a website for free using online resources.
You can create a website in just 1-2 hours if you have some free time. Let’s get started…
How much does it cost to create a website?
It doesn’t cost anything to create a website. It can be completely free, depending on the tools and resources you use. You can build a professional-looking website without spending any money by using online website builders such as Wix, Weebly, or WordPress.
However, if you want more features and customization options, you may need to pay for a premium plan. These plans usually start at around $5/month and can go up to hundreds of dollars per month, depending on your required features.
How long does it take to create a website?
Creating a website usually doesn’t take more than 2 hours. Depending on the complexity of your project, it can take longer or less time. Using a website builder, you can customize and launch your website in no time.
However, if your website requires coding knowledge, it may take a few days or weeks to complete.
What Do You Need To Create a Website?
If you want to create a website, you’ll need a few things. First, you will need the following:
- Narrowing in on a particular topic or goal (like SEO, Email Marketing, Health & Fitness, etc.).
- A domain name (your custom web address, www.YourSite com).
- Website hosting (Your website needs a home on the internet, and that’s where website hosting comes in. This service stores your site so customers can view it online).
- Platform (among the most popular website platforms are WordPress, Wix, Weebly, Squarespace, and Shopify).
- Design or Template (A design or template is a premade website design that can help your business website look more professional, like “WordPress Themes”).
- Content (Content is essential if you want people to visit your website).
- SEO (The process of receiving free traffic from search engines, for example, Google).
- Google Analytics (Needed to check your website visitor details).
Once you have these things, it’s time to start creating your website. Ready? Let’s get started…
Choose A Right Niche For Your Website or Blog
When building a successful website, you need to find the right niche. Choosing the right niche is important because it can determine the success or failure of your website.
There are many different niches for bloggers and content creators to choose from, but not all are equally profitable or rewarding. Therefore, when picking your topic or concept, you must select something that interests you personally and already has enough following behind it. This will ensure that there is an audience for your content and that you are motivated to continue producing high-quality content.
You don’t want to waste your time or effort on something that people are not interested in when there are other topics out there that have the potential to be just as fulfilling but also much more rewarding later down the track. Finding a niche before it becomes over-saturated is critical; too many bloggers creating content around the same topic can make it difficult to stand out from the crowd.
Therefore, it is essential to do your research and find a niche that meets the following criteria:
- Interests you personally.
- It already has a following.
- Not yet over-saturated.
- Has potential for profitability.
Some great tools are available if you’re looking for a niche to explore. I would recommend Niche Scraper and FindNiche. They offer a free trial and a helpful user interface to make finding a niche easier. They also feature search filters so you can find the perfect niche for you.
Some best blogging niches are:
- Personal Finance
- Health and Fitness
- Home Decor
- Travel
- Beauty
- Fashion
- Food and Drink
- Tech
- Gaming
Many other niches have been the most popular recently, but these are listed above. Remember, selecting a topic you love and relate to is always best, creating content with passion and enthusiasm.
By doing your due diligence and finding the right niche, you will be well on your way to creating a successful website or blog.
Choose a Perfect Domain Name For Creating a Website

The second thing you need to create a website is a domain name.
The domain name is the name and address of your website. This address is used by visitors when they try to find your website using their web internet browser.
When creating a business website, your domain name should be the same as your company name. For example, if your company is called “Think Digity,” you should register the domain name “thinkdigity.com.”
Using a “.com” extension can be an excellent alternative if you’re preparing to build a single website.
It would be best if you chose the right domain name to make your website business successful. Domain names are crucial for search engine optimization because they will either help or hurt your brand and rankings in Google Search results.
Domain names usually cost between $10 and $50 annually. The standard price is usually $15.
If you haven’t signed up or haven’t selected a domain name for your website, here are a few ideas to help you do this:
- When creating a business website, your domain name should be the same as your company name. For example, your business name .com.
- If you are preparing to build a single website, your name .com can be an excellent alternative.
- Use a “generic” domain name extension such as com, web, and org if your target is global or US visitors. Use a “local” domain name extension such as .de, or .ch if your target is national visitors.
Don’t fret if your first domain name choice is unavailable. More than 300 million domains are registered monthly, so you’re bound to find an available one.
Here are some additional tips for choosing the right domain name:
- Keep it short.
- Use keywords.
- Try to select a brandable name.
- Make it catchy.
- Avoid numbers and hyphens.
- Make it readily memorable.
Where can you find a domain name?
There are plenty of platforms where you can register a domain name. Some of the best domain registration platforms are:
Here we’ll discuss getting a domain from Namecheap.com.
Register a Domain with NameCheap.com
If you are planning to buy a domain at namecheap.com, follow these instructions:
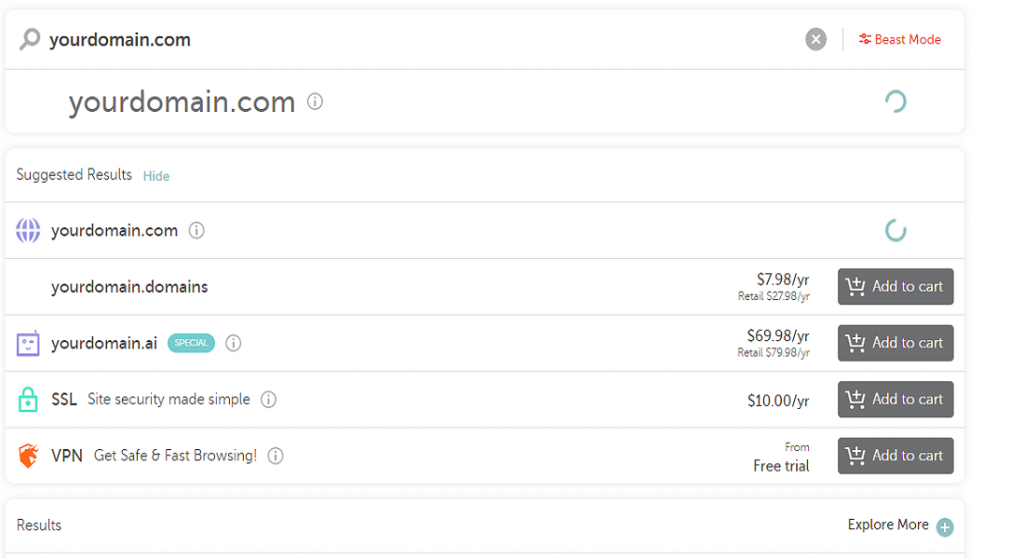
Visit www.namecheap.com and search for the desired web address (you can also use one of their many tools like Domain Name Checker). If it is available, go ahead with buying it; else, choose another alternative till your preferred website title becomes available on this online store.

Enter all necessary details about yourself, which we will require during our verification process before processing your order (we need information such as full legal names or business names and phone numbers/emails).
Pay through any convenient mode that suits you best among options, including credit cards, PayPal accounts, etc.).
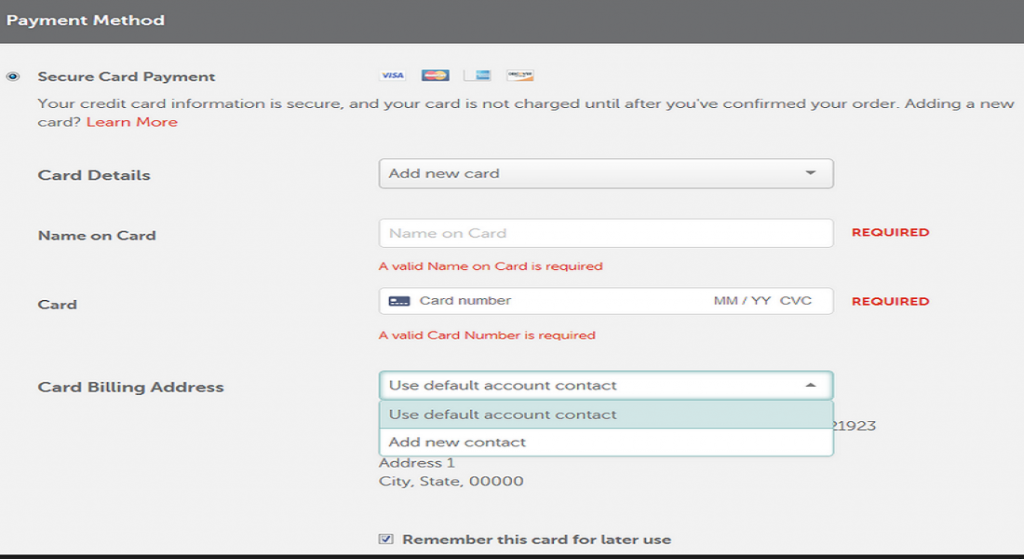
Wait for them to contact you (usually, it takes around 15 minutes). Then, they will send you an email asking for your verification.
Once their team members confirm that the order information is correct, they will start processing this purchase (it’ll generally take two working hours).
After that, you can start managing your new domain name from their platform. Don’t forget to check frequently whether all necessary changes have been made and updated as per the requirement (you can explore multiple setting options on their website).
Finally, congratulations! You’re now ready to create a website with this newly-registered domain. Enjoy!
Remember that when creating a website with your newly-registered domain name, it is essential to make it visible and easily accessible to the public. Therefore, you can ensure your domain’s DNS records (such as A and CNAME).
That’s it. Now you’re ready to choose a Hosting provider for your website.
[To see the Top 10 hosting providers, please check here.]
Choose a Perfect Web Hosting for Your Website

Once you’ve chosen your domain name, the next step is to sign up for web hosting.
Web hosting is a service that hosts and stores your website data (content) on a secure server that is always on. Without a web host, your website will certainly not be read and crawled by others.
There are a lot of web hosting providers out there—from shared hosting to dedicated hosting. Choosing the right one to meet your needs and budget is essential.
Affordable and reliable web hosting for brand-new websites generally costs anywhere from $3 to $10 per month—less than a cup of coffee but an essential financial investment for your website’s success.
Regardless of which web hosting company you sign up with, make sure it does the following:
- FREE domain name with SSL (for security).
- One- click-install for WordPress (free).
- Custom email accounts.
- Unlimited or unmetered transmission capacity (no traffic constraints).
- Customer support, ideally 24/7 LiveChat.
If you can find website hosting that takes advantage of it, you have most likely found a great provider.
What are the best web hosting services today?
We have researched the best web hosting companies in the world today. After all, your website represents you, and what better way to present yourself than with an immaculate website presented among other top-rated websites? We won’t keep you waiting. To help you find the best web host for your website, here’s a list of the top 10 web hosting providers:
To make your website creation process more straightforward and less expensive, we recommend using Bluehost.com for web hosting and domain name registration.
Want to know more about Bluehost? Follow this link for our comprehensive review!
Bluehost hosting plans start at $2.75/month with our discount link and have all the features needed to set up a website.
How To Register and Get Your First Website Hosting From Bluehost?
Registering for hosting on Bluehost is easy and quick. This article will show you how to sign up for your first website hosting account with Bluehost.
1) To begin hosting your account through Bluehost, click “Get Started Now.”
2) Next, choose your web hosting plan. Finally, create a Website (choice plus is unlimited, while ideal for brand new websites).

3) Next, select and register a domain name (free for the initial year).
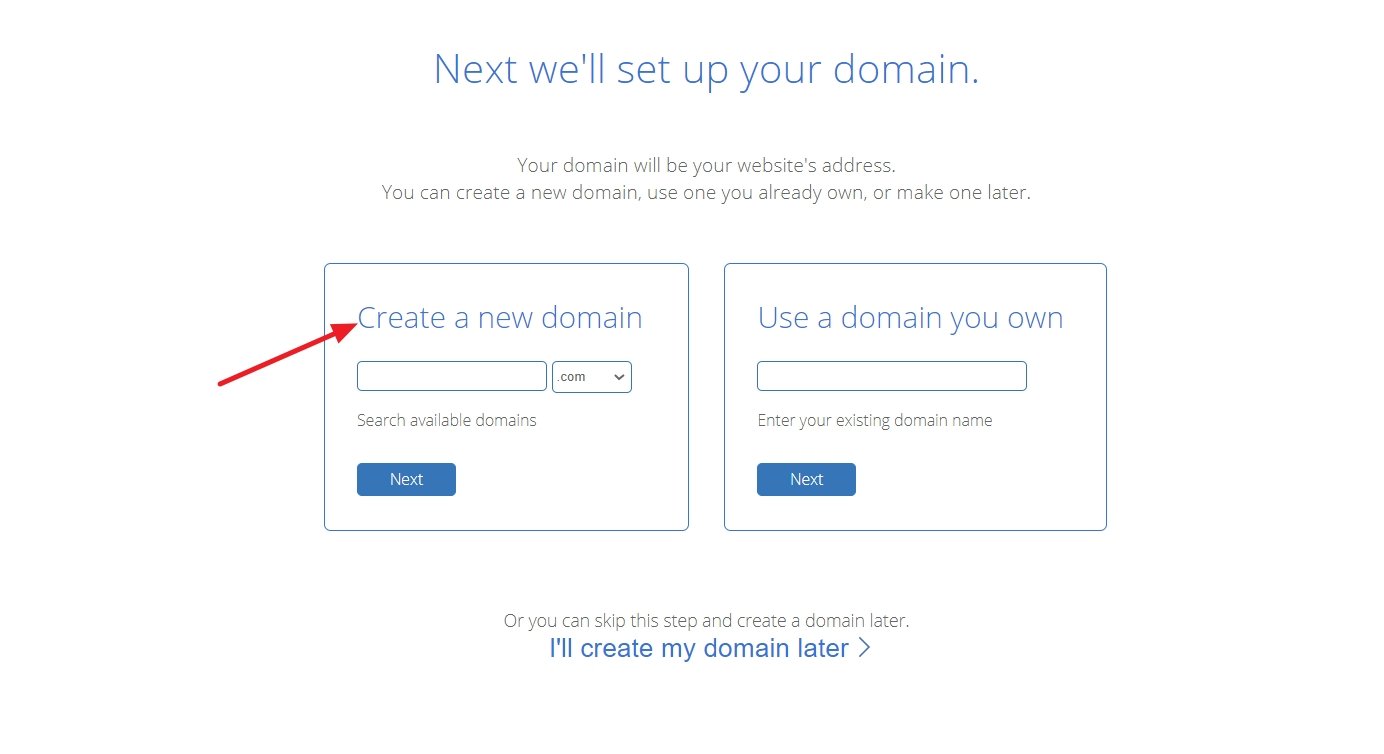
4) With the registration process completed, you will now have instant access to start building your website.
Bluehost does not offer country-specific closings of domain names such as .de, .fr, .or .ru. However, if you need these, you can purchase them independently from Namecheap.com, Domain.com, or GoDaddy.com.
If you currently have a domain name elsewhere, you can hook it up to your brand-new hosting plan with Bluehost. Some additional actions no doubt require the following – like updating your name and web servers. Here is a guide from Bluehost on how to do that.
When you have successfully linked your domain name and hosting, you can now get to the fun part – building your website!
Now that you know how to choose a perfect web host for your website, it’s time to pick one and start building your online presence!
Create a Website Using Platform
Once your domain name and hosting are ready, you must select a website-building platform (CMS).
There are many website-building platforms available, but some of the best include the following:
- WordPress
- Wix
- Weebly
- Squarespace
You can pick one and start building a website or make a more informed decision.
We recommend that you go for WordPress as it is easy to use and has tons of free layouts and attachments that will make your website look professional and unique.
Setting up your WordPress website builder is easy, and your web host does this for you in the first place, so you don’t have to get your hands dirty.
Don’t fret if you aren’t using Bluehost as your hosting web service. Many web hosting providers have “WordPress Install” somewhere in the hosting cPanel if you take care of a web host that doesn’t offer “one-click installs” and tries to set up WordPress manually.
1) Installing WordPress Website on Bluehost
- Log in to your Bluehost account.
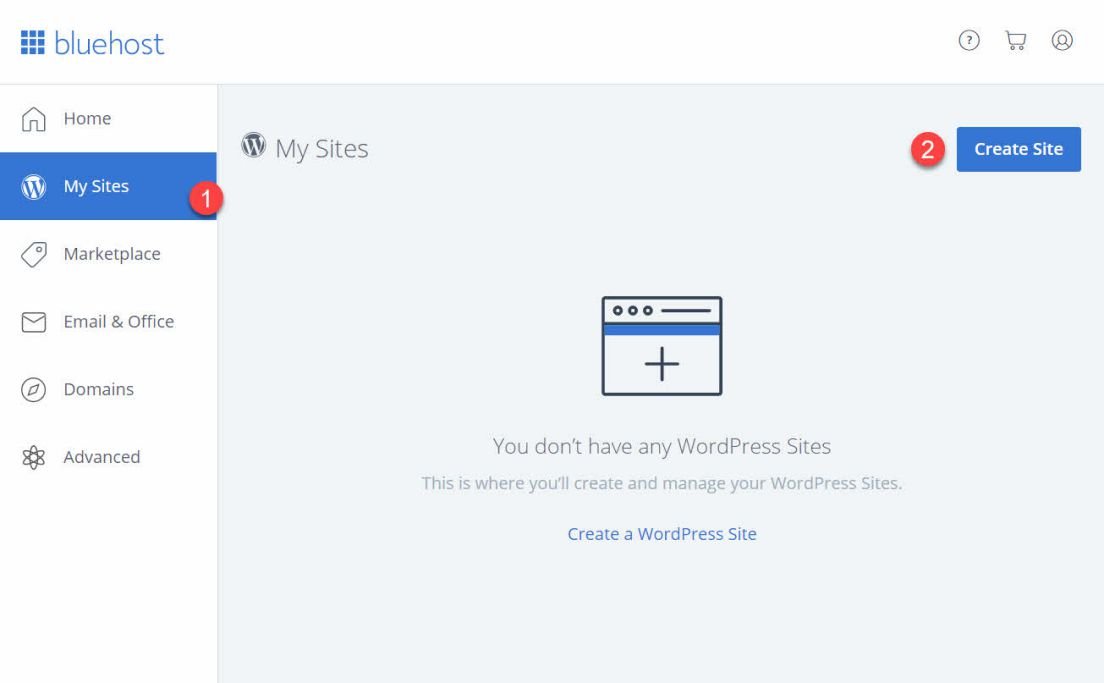
- Click on “My Sites” and after that on “Create Site”

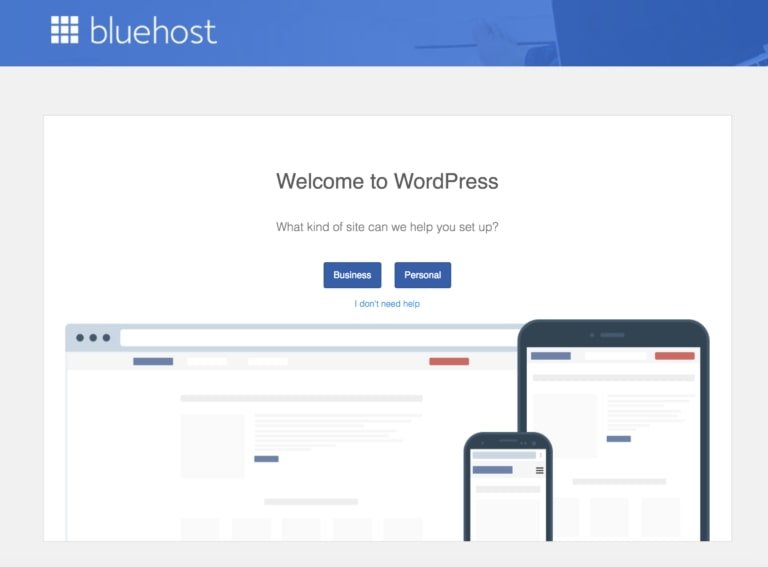
- Provide basic details about your site, and your WordPress setup will begin. It will certainly all take place on autopilot.
- Bluehost will show you the setup and login information when the setup is complete. But, again, keep this data in a place with no risk.

2) Test Your Website By Typing in Your Domain Address
With WordPress enabled, here’s a test to see if website are running.
The easiest way is to enter your domain name directly into the web browser.
With WordPress properly provisioned, you will see an entire website like this:

If this doesn’t look appealing, don’t fret, you will quickly discover how to change the design into something much more attractive.
3) Verify SSL/HTTPS Settings
In short, SSL certification ensures that your website is firmly available to your visitors.
Bluehost includes an SSL instantly when you create a brand new website or deploy WordPress. To check the SSL status of your site, do the following:
- First, log in to your Bluehost site.
- Click on “My Sites”
- Find your site and click “Manage Site.”
- Go to the “Security” tab.
- Under “Security Certificate,” you will undoubtedly locate your “Free SSL Certificate” standing.
You should see a lock icon after your domain name in your web browser if something works.
The SSL can take a few hours to be fully set up. However, this shouldn’t stop you from building your website.
Customize Your Website Design Layout and Structure

If your bare website is up and running, now is the time to make it feel like your own by choosing a good design, customizing it, and incorporating branded components.
1) Choose a Theme to Create a Website
WordPress themes are out-of-the-box design packs that will change how your entire website looks. In addition, WordPress themes are compatible – you can easily switch from style to style.
Most importantly, there are tons of free and paid WordPress topics on the Internet.
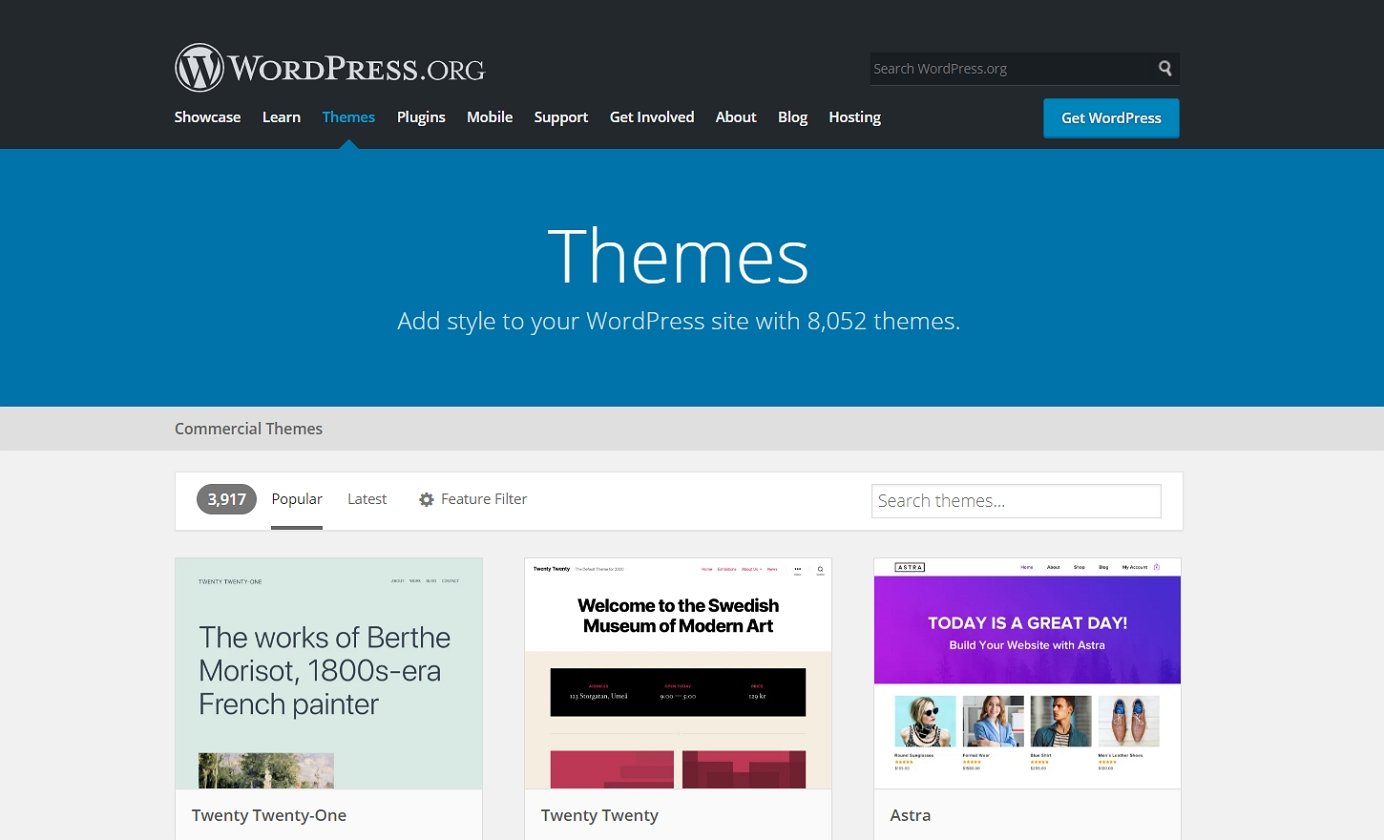
Suppose you want to get a freestyle – where many people love to start – the most effective place is the leading style directory site at WordPress.org. Especially the area for one of the most popular topics.
It has been confirmed that all your themes are of excellent quality and have a massive customer base.
You can review this list and choose an elegant style to earn points in this guide. We never recommend it.
Its flexible style includes several starter sites (design packs for different niches and locations).
We’ll be using this style in this guide in the future.
Here are some best WordPress themes we tested:
2) Install the Theme You Choose
First, go to your WordPress administration interface. You can find it at YOURSITE.com/wp-admin. Use the username and password you give throughout the WordPress setup.
1) From the sidebar, go to “Themes → Add New.”
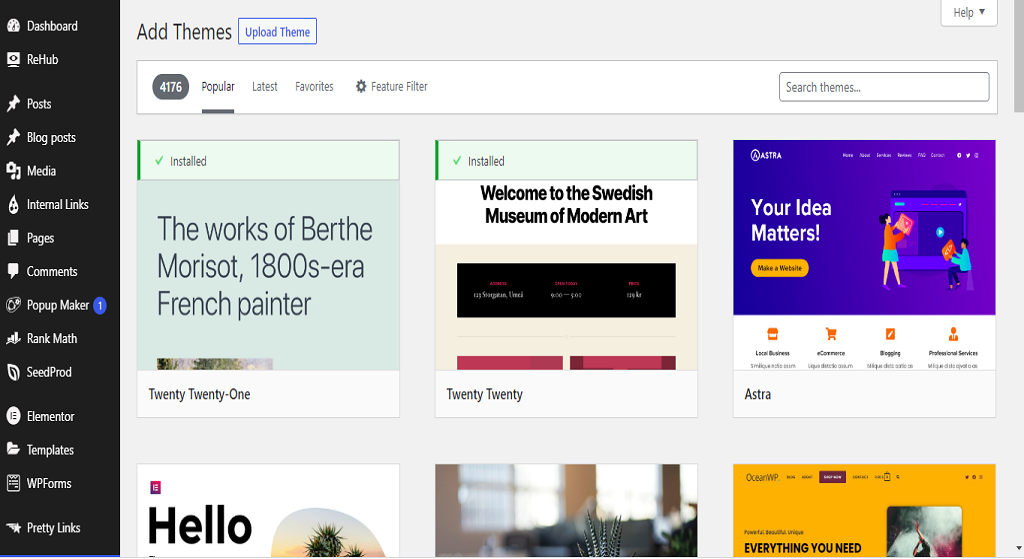
2) We choose the Neve theme because it is free and has excellent reviews. Enter “Neve” in the search box and click the “Install” button that follows the name of the style (you’ll need to move your computer mouse over the style box).
3) After the setup is complete, click the “Activate” button, which will appear in place of the “Install” button.
4) You will see a success message that indicates that the setup went as expected.
3) Import a Design
Although the style is energetic now, there are a few far more points you should consider for it to look right.
You’ll see this welcome message:

One of the great things about Neve is that it doesn’t just give you a design. Instead, it gives you many different layouts to choose from. Click the giant blue switch to reveal them.

There are more than 20 layouts available for free. They cover most of the main website’s niches, such as business, restaurant, health and fitness, songs, food, wedding party, digital photography, e-commerce, profile, etc. Therefore, regardless of the theme of your website, you can find a suitable design plan.
We will select the first in the list for this manual, “Original.”
You will see that this setup procedure covers all the components you need on your site – you get the design itself, all the plugins required to function, and demo content that you can change later.
Click the Import button to see what’s going on. After a minute or two, you will see the success message.

Next, go to “Appearance → Neve Options” to see what else you can do with the style.

We’re going to check out several of the options listed below:
4) Add a Logo
Many people want their logo design uploaded and displayed at the top left of the website. So let’s do that for now.
You can do it yourself with a logo design. Here are some tools you can use to create a logo design yourself.
Once you’ve prepared a logo design, it will be added to your website. First, go to “Appearance → Neve Options” and click the “Upload Logo” link.

Here’s what you’ll see:

The WordPress Customizer is the user interface that allows you to change various aspects of your website’s appearance. If you’re a beginner, you can upload your logo design by clicking on the “Select Logo” button near the top-left edge.
WordPress gives you the option to have a logo, but you don’t HAVE to have one. A logo can help your site look professional, but it’s not required.

If you add a logo, you should soon see your logo design around the edge of the page. You can also choose to display the site name and tagline logo design. You can also set the maximum width for the logo design. Try different settings until you find the ones that work best for you.
When you’re finished, click the Publish button (top left), then click the X button to exit the customizer. If you decide to change your logo design in the future, you can easily do so by visiting the same page and editing the settings. It’s also possible to add additional logos if you’d like, such as a white version for light backgrounds or a smaller version for mobile devices. However, it’s important to note that having too many logos may make the page look cluttered. So be sure to use logo designs sparingly and strategically.
Once you’ve published your logo, visitors to your site will be able to recognize it as the official identity of your website. It’s also great to make your site stand out from the competition! A professional logo design can help your site look professional and give visitors a positive first impression.
5) Change the Website Color Scheme and Fonts
Another point to try is transforming the color systems and fonts used on the site. Finally, building a website is easy to make your website more unique and harmonious with your brand name identification.
To start, go to “Appearance → Neve Options” once more. Then, we’re going to concentrate on complying with two options:

First, click “Set Colors.”
Many WordPress themes get their colors from a color system. These are often the shades used for web links, news items, and backgrounds.
You can change the color assignments for the Neve style using the customizer.
To change any colors, click on it and choose brand new paint.
Click on “Publish” and “X.”
Changing typefaces functions:
- Click on the “Customize Fonts” link in the “Appearance → Neve Options” panel.
- Neve allows you to select from an entire brochure of system typefaces and Google Fonts.
- Click the “Font Family” box and choose the font you like.

- After that, you can adjust the private typefaces utilized for your headings.
Experiment with these setups to see the impact they carry on your site.
- To customize the font utilized for your site’s body area, click the arrowhead switch near the top left.

- Click on “General.” These lead you to a similar radio button, but you’re changing the text font this time.
- Click on “Publish” and “X” when done.
6) Add a Sidebar
Most websites have a sidebar on the right side of the page. However, you can choose to have no sidebar, a left sidebar, or a right sidebar. The right sidebar is the traditional format, but you can specify the content size.
To do this, go to the “Appearance → New Options” area and click “Contents / Sidebar.” Here you can adjust the size of your sidebar and other settings. Once you have made your changes, click “Publish” and “X” to save your work.
7) Add Widgets
Widgets are such small content barriers that generally display in the sidebars of websites. However, since we set up the sidebar in the previous action, you can customize it using widgets.
To set up widgets, go to “Appearance → Widgets.” You’ll see this:
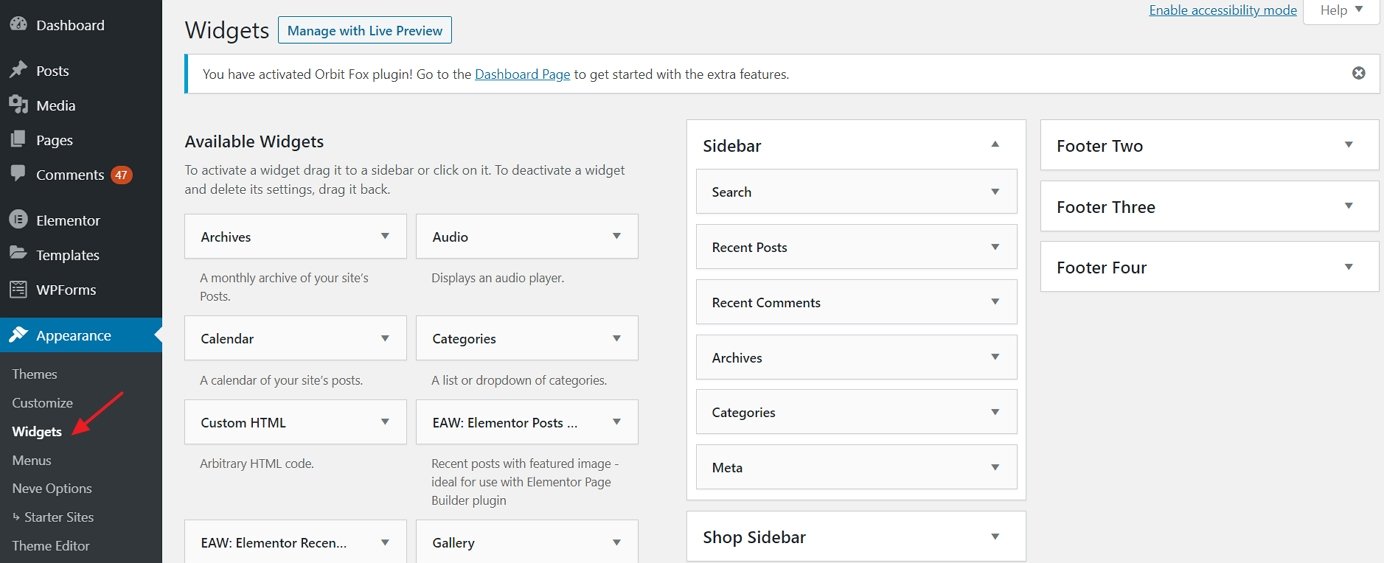
You can view all available widgets. You can find all the widget locations supported by your current style on the right. To include a sidebar device, you have to grab the widget from the left and drag and drop it onto the sidebar position.
For example, if you want to list your pages in the sidebar, access the Pages widget and drag it to the sidebar area. You can also make some basic device settings.
8) Experiment With the Theme You Built
We covered the above to find out how to create a website that stands out and looks first. However, there are many more options available.
To see them all, go to “Appearance → Customize.” It will surely unload the main customizer interface with its settings and presets.
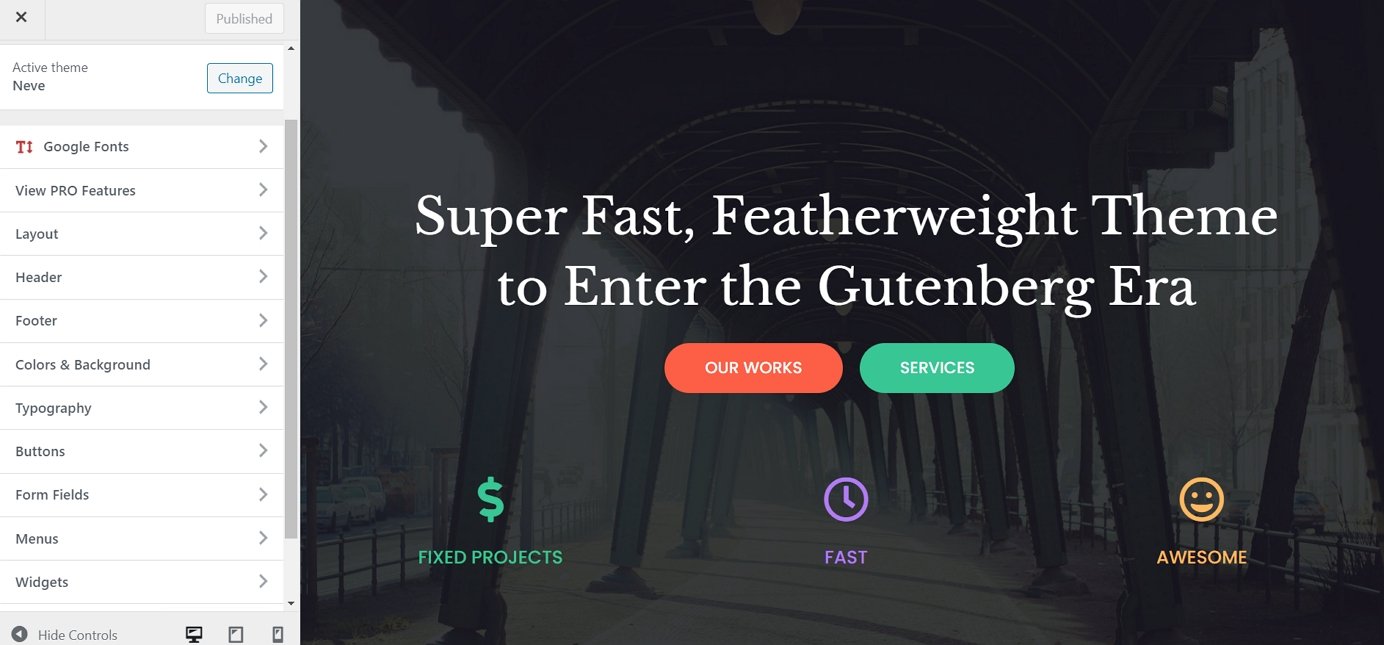
We strongly encourage you to find out what is available and experiment with several options. In addition, you’re likely to encounter some customizations that we haven’t talked about below.
9) Add a Contact Form
Contact forms are essential for any website. They let visitors get in touch with you quickly and easily.
To add a contact form, begin by downloading and installing the WPForms plugin from your WordPress dashboard. Then go to “WPForms → Add New” to create a new form.
In the form builder, choose one of the premade contact forms. You can also add fields for collecting additional information from your visitors. Once satisfied with your form, click “Publish” and “X” to save your work.
Finally, go to “Appearance → Widgets” and drag the WPForms widget to your sidebar. Select your contact form from the drop-down list and click “Save.” You should now see a fully functioning contact form in your sidebar.
Congratulations! You have just created a complete website with Neve WordPress Theme. Enjoy!
Add Pages to Your Website

Webpages are integral to a well-functioning website; they provide structure and navigation for visitors.
Websites, technically speaking, are just documents on the internet – not too different from your typical Word document. They include all of the branded features of your website, like headers, footers, etc.
It’s simple to create web pages in WordPress. However, before we show you how, let’s first review which pages you should add to your site.
Most websites are sure to find the pages they need:
- Homepage: This is the first page your visitors see on your website.
- About Page: A page that explains what your website is about.
- Contact Page: A page where visitors can contact you.
- Blog Page: A list of your latest blog posts; If you don’t intend to blog, you can use the blog site page to locate your company information and statements.
- Services Page: If the website you are creating is for a business, this is the page where you can view your services.
- Shop Page: For a company looking to launch an eCommerce store.
Many of the above pages will undoubtedly be highly comparable in scope – the only difference is the actual page’s content. Thus, figuring out how to create a page is how to make all of the pages. With that, there are some subtleties below. For now, let’s describe how to make several basic types of pages:
1) Creating a Homepage
If you’re making use of Neve, your homepage looks something such as this:
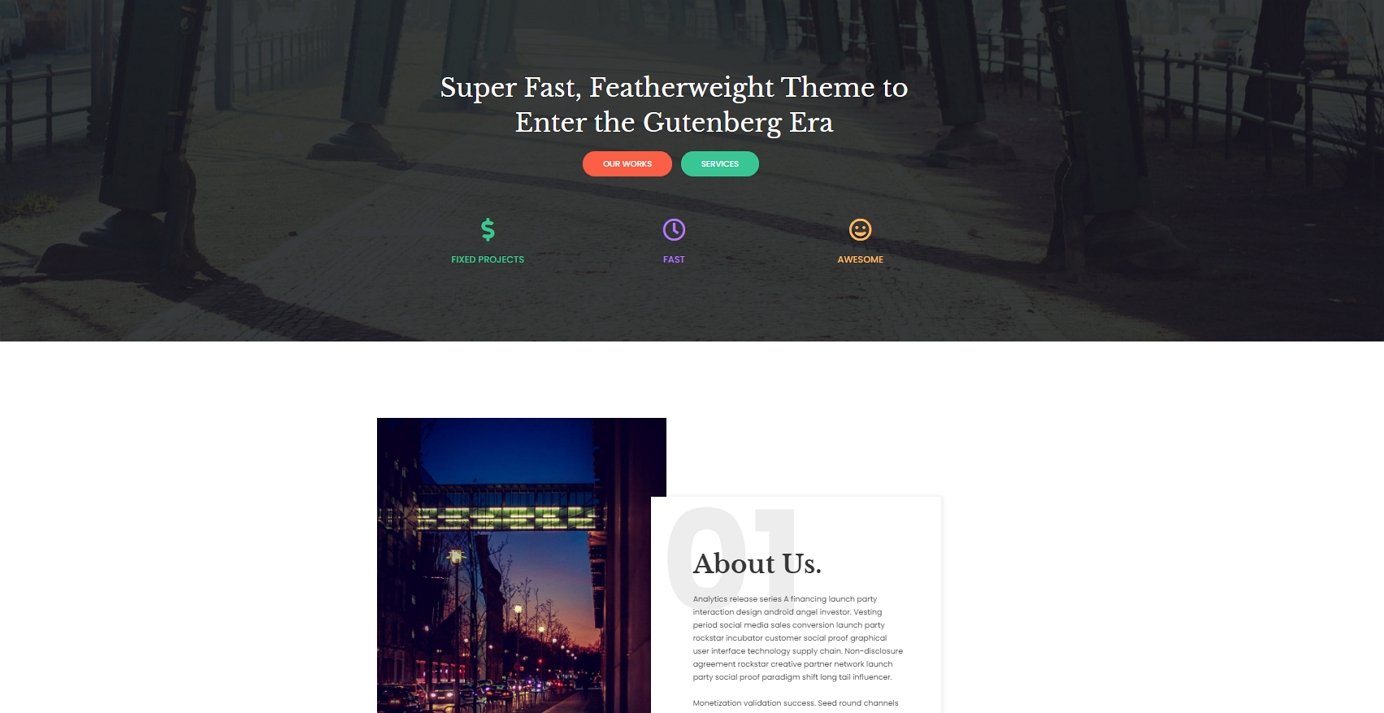
Of course, you can change the framework of this page and the components on it (all messages and images).
To do this, click on the “Edit with Elementor” button in the top bar.

What you’ll see is the interface of the Elementor page builder.
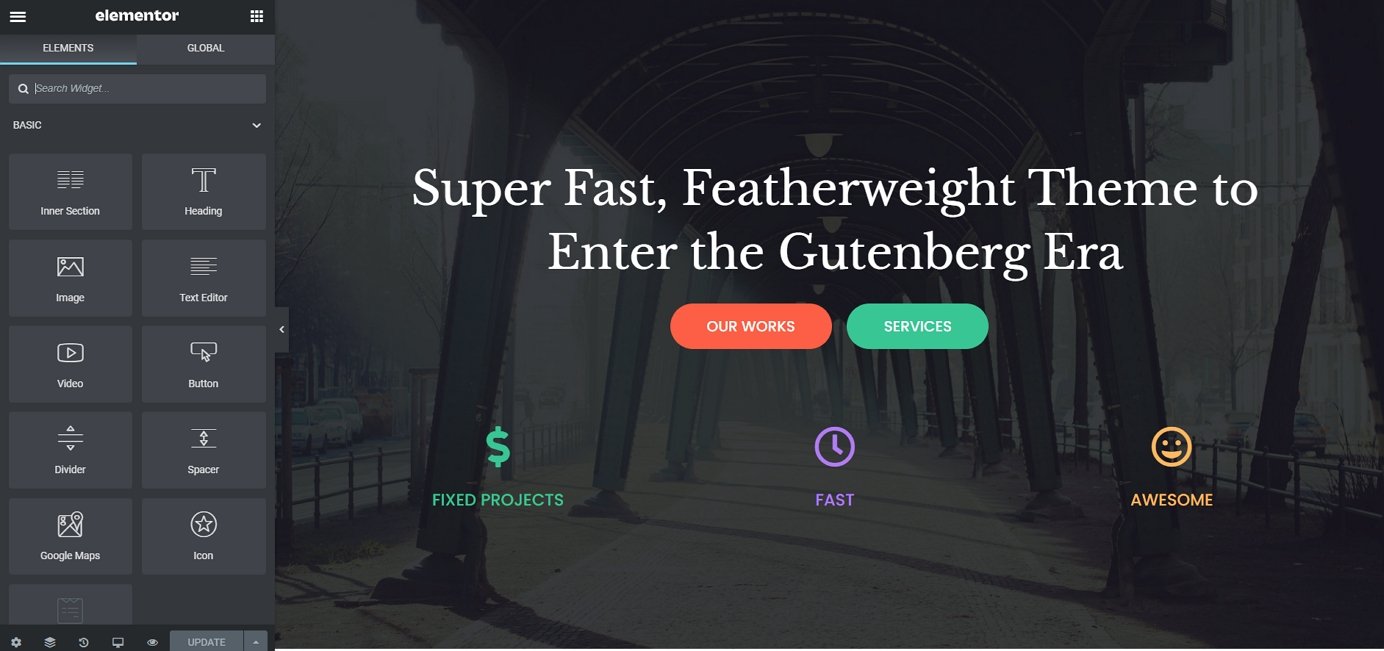
Elementor is what we call a visual page builder. That indicates that you can click on any component on the page and modify them directly. So, for example, if you want to change the primary heading, click on it and start typing.
Looking at the left sidebar, you’ll find an entire customization window. You can re-customize the framework and design of all types of content blocks. For example, here’s what you can see while maintaining the heading:

Another great point is that you can grab any component on the page and drag and drop it to a different location.
Click the little square icon at the top left to include brand-new components.
You will see a list of all the available content barriers.
Please take one of the blocks and drag it onto the page’s canvas.
The ideal way to deal with your homepage is to block and modify the test content on the page.
Enter brand new message content, straighten multiple blocks, delete the ones you don’t need, and add new blocks as required.
This entire user interface is quite user-friendly. Just invest an hour or two in using them and try different points.
2) Create Pages Such as “About,” “Services,” and “Contact.”
Building traditional websites is also less complicated in WordPress than maintaining your home page. Go to “Pages → Add New” on the right. You see this interface:
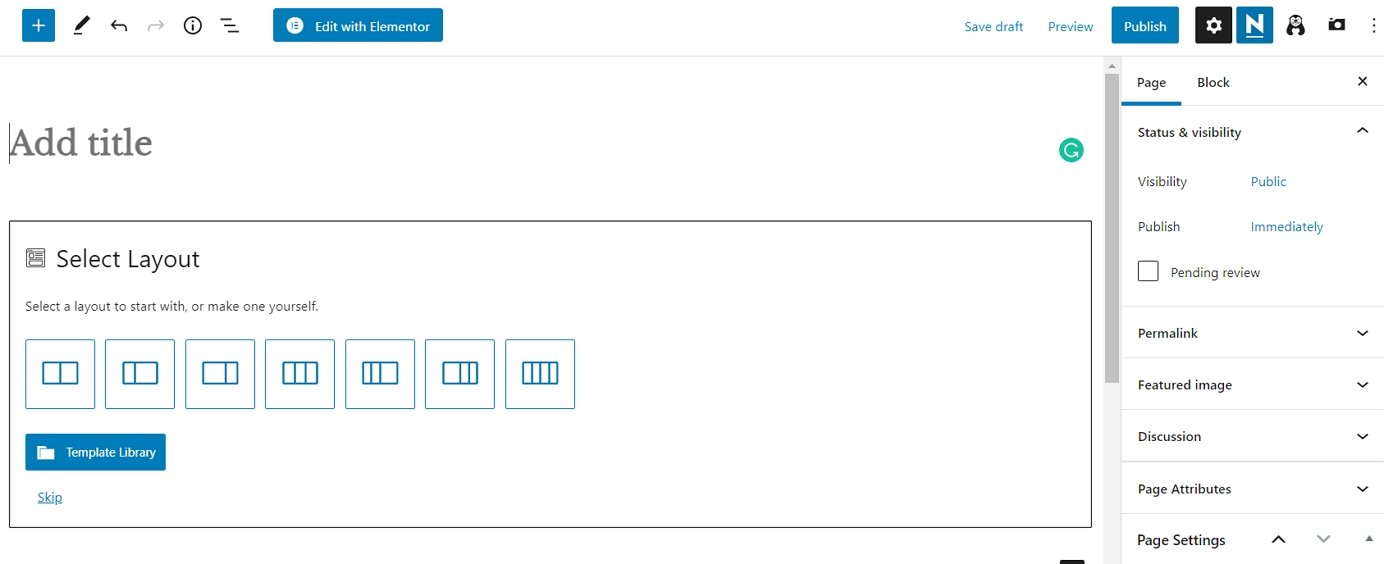
A title requires for each page. So first, add a label that says “Add Title.” For example, “About Us” or “Contact.”
Next, choose a page size. If you create a standard page, you can select the first page in the list – “Single Line.” Then, to evaluate points, you can choose from the collection of topics. To do this, click on Sky Switch.
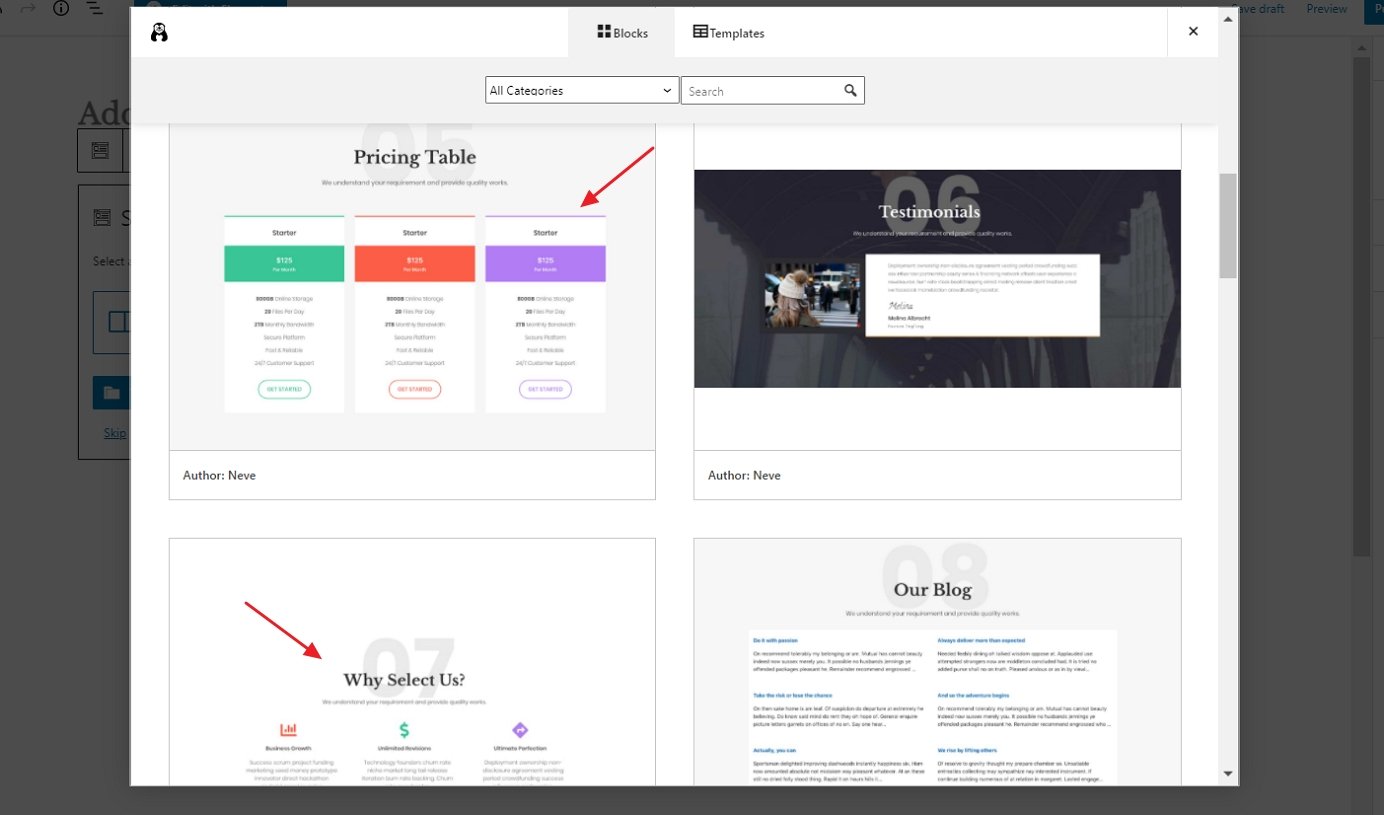
You will see a start window in which you can choose from many ready-made page areas. For example, if you are maintaining your page in question, you can quickly find and use the appropriate blocks:

Just click the “Insert” button that follows the block you want, and it will appear on the page. But, of course, you can also customize it, change the messages, or change pictures.

When you do, click the Publish button at the top of the ad.
You can use the same procedure to maintain your contact or service page.
Just pick different pages that hinder topic collection. For example, these should work great on a service page:
If you’d like to add brand new page components by hand, click the “+” symbol at the top left of the editor interface instead of using the templates.
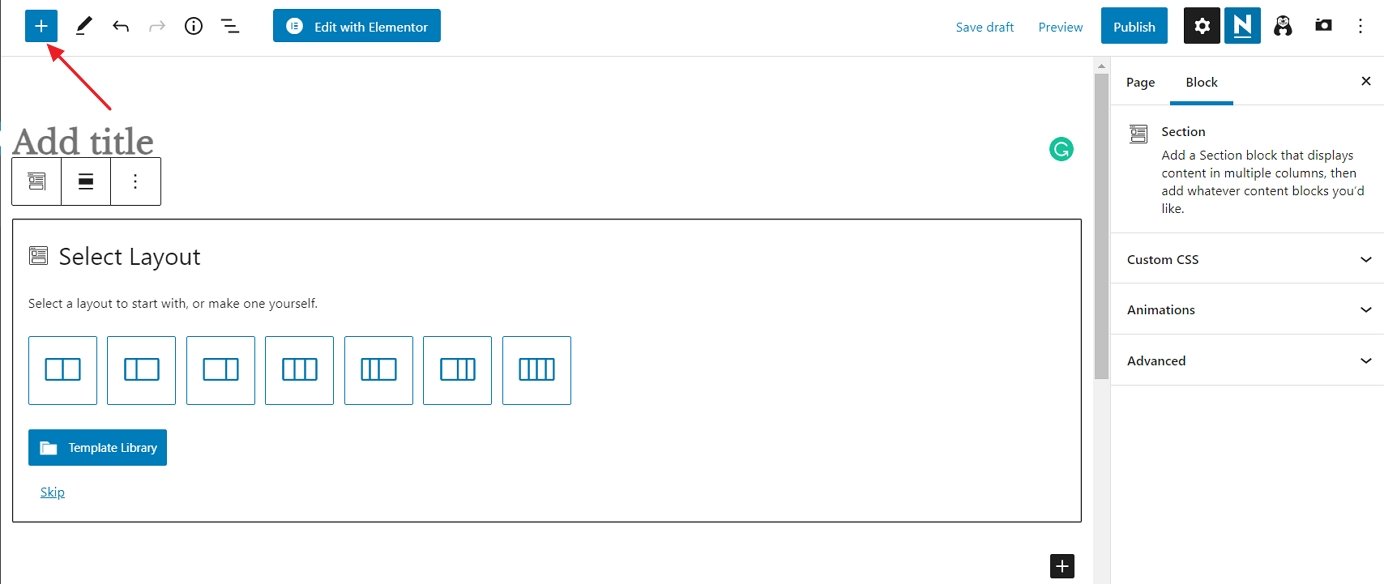
Any obstacle you choose there will show up at the bottom of your page. That is what a brand new heading block looks like:

As you can see, you can openly change the message’s living properties, and the best sidebar has color settings.
As always, remember to click Publish when you’re done.
3) Create a Blog Page
The blog site page is the list of your most recent blog posts.
The excellent information is that, for now, the blog site page was created for you. It occurred when you deployed WordPress and the Neve style. You can see this page by going to “Pages”:

Then, click on the “View” link to visit your blog site page at work.
Adding brand-new blog posts:
To include brand-new blog posts, go to “Posts → Add New.”

Does this interface advise you about anything? Yes, this coincides with the change in the atmosphere we used when creating standard pages. Easy!
Create a Website: Set Up a Navigation Menu

After several attractive pages have been created, the following action in our website-building mission is to collect your navigation (a selection of website foods). The food choices will surely use your visitors to move from page to page on your website.
Go to “Appearance → Menus,” and click “create a new menu.”

Name your menu, select it from the drop-down list next to “Menu Name,” and click the “Create Menu” button.
The following step is to add food items (pages) to your menus. To do this, you need to check out the left column of this interface:
On the left (under “Menu Structure”), you can find the pages and posts on your website. Check each item to include it in your menu, then click the “Add To Menu” button.
The menus under “Menu Structure” appear when you switch them with the mouse. This will help you organize your food choices in a hierarchical structure.
Finally, don’t forget to click the “Save Menu” button, and you are done! Your guests will now have a way of navigating your website with ease.
Customize Your Website With Widgets
Widgets provide extra features on your site that make it easier for users to interact with your content. For example, you can add widgets to the sidebar and footer areas of your website, or if you’re using a theme that supports custom templates, you can create widget-ready spaces in other places around your site.
To access the available widgets, go to “Appearance → Widgets.” You can drag the widgets from the left column and drop them into any of the widget-ready areas on the right.
The options for customizing your widgets vary depending on which ones you choose, but all will allow you to customize titles and features related to their functionality. For example, if you have installed a social media widget, you can link it to your social media accounts.
Once you’ve finished, click “Save,” and the widgets should appear on your site.
Create a Website: Add an Online Store/eCommerce
The last point in this guide is how to build an online store.
Follow this step-by-step tutorial below to add an online store to your freshly created website.
These are not required for all websites. So you can avoid this action if you don’t want to access eCommerce directly.
How WordPress eCommerce Works
With WordPress being such a flexible website platform, it’s no surprise that you can use it to build a fully functional eCommerce online store.

We encourage you to list all types of items, make them available for sale, collect orders from customers, and cover all of the taxable and shipping-related components of the whole process.
It all ends with a plugin called WooCommerce.
WooCommerce is one of WordPress’s most popular, comprehensive, and truthfully effective e-commerce solutions.
We have a completely separate guide on how to get WooCommerce on your WordPress website. We invite you to jump over there and read a detailed guide following steps 3 and 4. Then come back below.
With WooCommerce on your website and the articles in your brochure, you will find that WooCommerce instantly creates brand-new pages simultaneously.
These pages are:
- “Shopping Cart” – your shop’s shopping cart
- “Checkout” – the checkout page where customers can complete their purchases
- “My Account” – each customer’s account; keeps previous orders, current information, and various other custom details; The customer can change his attributes constantly.
- “Shop” / “Products” – the central store page – the page on which your items list in detail
Each page offers a detailed function for your shop and its functionality. The excellent information is that many topics are tweaked to make these pages look right. The Neve style is no different. When you visit any of these brand-new pages, you will find that the discussion is clear and easy to understand. Here is an instance of the cart page:

Other than that, these pages work like various other pages on your WordPress website. You can change them, include your components, or change points like shades, designs, etc. However, be careful not to remove the currently existing WooCommerce shortcodes.
Additionally, you will see a brand new shopping cart icon on the primary food selection on your website.
At this stage, your e-commerce shop is fully functional. That indicates your customers can be found in and do their shopping. In addition, you can see your orders in the WordPress administration location under “WooCommerce → Orders.”

Now you completed your eCommerce store to sell your niche-based products.
Create a Website: Publish Your Website

It’s time to go live with your new company website. That is where you should do one final preview to make sure your website meets your specs. All pages contain the potential information customers need to make a purchase.
When you’re ready to launch your website worldwide, click Publish. You can always go back to your site in the WordPress Editor if you need to make changes.
To make changes, go to your dashboard, select “Manage Website,” then “Edit Website.” When you’ve made the necessary changes, click Publish to go live.
Create Website Content or Blog Post
You completed your website-building tasks. However, you need fresh, unique content or blog post to attract website visitors.
Here we discuss how you can create a blog post.
Good website content is the magnet of your site. It’s arguably more important than anything else to help you achieve marketing goals, whether a complete redesign or just looking to improve an existing one. Of course, a good strategy in place will help immensely with this process, so make sure that all bases are covered!
If you want a significant web presence, it’s essential to have compelling content that engages your users and resonates with them.
To achieve this goal, here are some steps into developing an online strategy for better digital engagement:
- Determine the Purpose of the Website.
- Deep Research on the Audience.
- Research Competing Websites.
- Write a Catchy Headline.
- Use conversational English.
- Use pictures to help tell your story.
- Mix up your word choice.
- Optimize the Page for SEO.
- Plan to Update Content In the Future.
Instead of putting all your time into tagging, labeling, and identifying everything on content, focus on what’s most important for credibility. For example, suppose leadership is a strength; you have to try not to highlight blog entries related to movies because they may seem unimportant or unrelated. Instead, use Google Alerts to monitor how others perceive who you are and change the things that don’t reflect well upon yourself if necessary.
You can also try creating videos and podcasts, as these are both popular ways to stay connected with your potential customers. By doing so, you’ll be able to integrate more multimedia into the website and increase content engagement. And lastly, use social media platforms such as Twitter and LinkedIn to promote content from your site within the online community.
These steps you can take to create website content or blog post. Creating content is a continuous process; if done correctly, it will bring more readers to your site and make them potential customers.
Need help creating your content? You can contact us today, and we’ll get your website content up and running in no time. We also provide services for web design, e-commerce setup, and more. Contact us today to find out what we can do for you!
Do SEO for Getting New Visitors

SEO is often the top topic on most people’s minds when creating or updating a website—because of this, creating content that isn’t already saturated with similar keywords and phrases as other sites in your industry space can be challenging.
Everyone who uses WordPress knows that their site needs an SEO plugin to find in search engine results.
When finding the best option for your website, Yoast is one of the most popular and unique options today. Even though there are many features packed into this tool (which can make using them all very complicated), you’ll get pinpoint control over how your page shows up in search engines with Yoast SEO!
Install Yoast SEO
This section will teach what Yoast SEO is and how to use it. If you are new to using an all-inclusive tool for your website, read on!
Step 1: Log in to your WordPress website.
When you’re logged in, it will display your dashboard.
Step 2: Click on ‘Plugins.’
On the left side, you will see a menu. In that menu, click on ‘Plugins.’
Step 3: Search for ‘Yoast SEO’
To find the Yoast SEO plugin, open your WordPress dashboard and type ‘Yoast’ in the search bar.

Step 4: Install the plugin.
Once you have found the plugin, click Install Now to make it work.
Step 5: Activate the plugin.
Once the installation has finished, click the ‘Activate’ button. It appears where you previously connected to install it.
Step 6: You’re done!
You can now go and configure the plugin. It will start to impact your website as soon as you configure it.
This is just a quick overview of Yoast SEO and how to install it. First, look at what this plugin can do for Digital Engagement.
Yoast SEO helps in many ways, such as optimizing page titles and meta descriptions, helping you create high-quality content, and enabling Breadcrumbs. It also helps to improve your post’s readability score, fix technical errors on the page, generate an XML sitemap, and much more.
By taking advantage of this tool, you can easily optimize your website for search engine rankings and help increase the traffic you get from organic searches.
You can also use Yoast SEO to make sure your content meets the standards of each major search engine and help you track website statistics like page views and click-through rates (CTRs). This enables you to understand what content strategy works best for your website and how to keep improving it.
How to do proper SEO for your Website?
A few crucial steps must be taken to ensure your website appears at the top of search engine results. Here are a few tips on how to do proper SEO for your website:
1. Research and Use Relevant Keywords
The most crucial step in SEO is choosing keywords related to your content that people are likely to use when searching for your company. Research trending keywords, long-tail keywords, or phrases similar to what you’re targeting, and make sure to include them in your website’s content.
2. Improve Site Speed
Google has made it known that page speed is an important ranking factor for its search engine results. Therefore, ensure your website loads quickly by optimizing images, reducing external scripts, and minifying code.
3. Make Your Site Mobile-Friendly
Nowadays, most people access the internet through their mobile devices, meaning having a mobile-friendly website is essential for getting noticed by search engine algorithms. Be sure to create an optimized version of your website for mobile devices and test it regularly.
4. Write Quality Content
Search engines prioritize websites with fresh and relevant content, so update your website regularly with high-quality articles, blog posts, and other engaging content pieces. This will help keep your rankings up and ensure more organic traffic comes to your site.
5. Monitor Your Rankings
Once you have an SEO strategy in place, it’s essential to monitor your rankings and track the progress of your website over time. This will help you stay on top of changing search engine algorithms trends and ensure that your website is always up-to-date with the latest best practices.
If you want to do SEO correctly, you will need tools to help manage different tasks, like keyword research, website ranking, and link-building.
After testing numerous tools, we found that these are the best SEO tools:
Set up Google Analytics to track visitors to your website

Google Analytics is a powerful tool for tracking website visitors. It will provide insights into the actions taken by people who visit your website, such as how they arrived at your site, what pages they viewed and how long they stayed on each page. This data can be used to measure the effectiveness of your SEO efforts and help you make more informed decisions about optimizing your content for search engine rankings.
Set up Google Search Console
Google Search Console is another essential tool for monitoring your website’s performance on Google. It allows you to keep track of the keywords people are using to find your website, pages that Google has indexed, and any crawl errors that may be preventing your website from being indexed correctly. You can also use it to submit an XML sitemap, track the progress of presented content, and more.
Google Search Console is a must-have tool for any serious SEO effort and can be easily integrated with Yoast SEO to help you get the most out of your optimization efforts.
Google Analytics for WordPress by MonsterInsights
MonsterInsights is the most popular Google Analytics plugin for WordPress. Over 3 million websites use it, including public companies, large non-profits, and well-known blogs like Bloomberg Businessweek, PlayStation LifeStyle, Zillow Group Inc., and WPBeginner.
MonsterInsights is easy to install on any WordPress website (it only takes a few minutes). It’s free, but premium versions are available if you want more advanced features.
To install MonsterInsights, first, download it from the WordPress Plugin Directory. Once you have installed and activated it in your site’s admin panel, a new menu called ‘Insights’ will appear under settings, where you can configure everything.
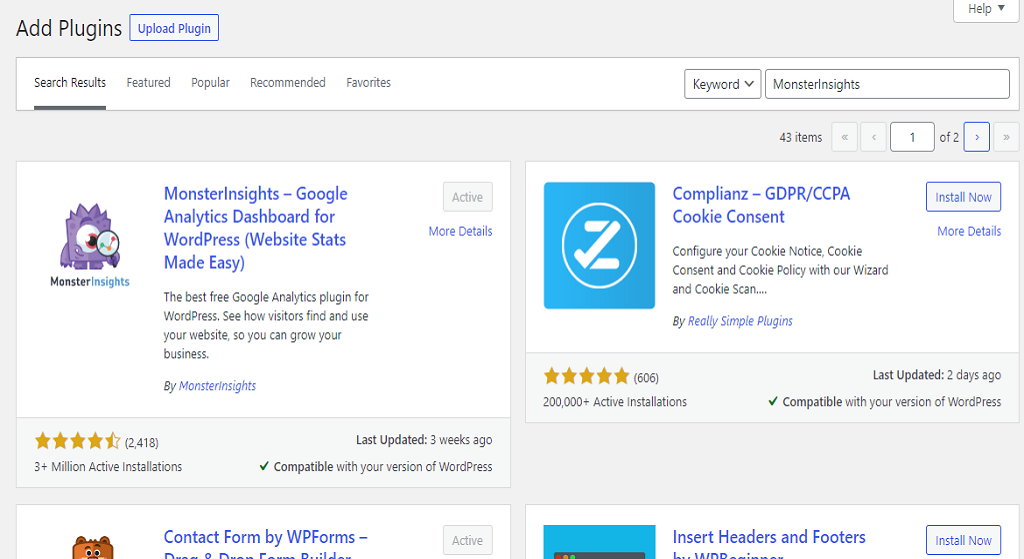
First, select the category for your website (a business website, blog, or online store), and click “Save and Continue.”
Clicking on the ‘Connect MonsterInsights’ button will create a popup asking you to sign in or select an existing Google account.

Allow MonsterInsights to access your Google Analytics account.

The final step is to select the profile you want to track. To do this, click on your website and then continue by clicking ‘Complete Connection.’
Google Analytics will now install itself on your website. Once this is done, you will be asked to pick your site’s recommended settings.
You can save your settings by clicking on the Save and Continue buttons.
All essential work on “how to create a website” is done now.
What Next?
Now that your website is live, you can switch gears to create compelling content, optimize your website for speed, and build your brand. Building your website is just the beginning of your online journey, with numerous things to learn and perfect.
If you still face problems creating a website, don’t hesitate to contact us.

